The easiest way to approach track braking is to look up its dictionary definition: "a system designed to slow down or stop a moving mechanical assembly." Nothing complicated, since we all agree that the goal of braking is to slow down to adapt our speed to the corner. But to really study it in detail, understand how it works mechanically, and optimize it on the track, we need to start by going back to school...
Vehicle dynamics
Every moving object possesses kinetic energy directly related to its mass and speed. This energy corresponds to the work required to go from a standstill to a given speed. As your physics teacher probably told you at some point: "nothing is lost, nothing is created, everything is transformed." This means that the energy acquired by the car during acceleration doesn't simply vanish into thin air at the slightest pressure on the brake pedal. It is transformed into heat by the braking system: its primary role is to dissipate the vehicle's kinetic energy.
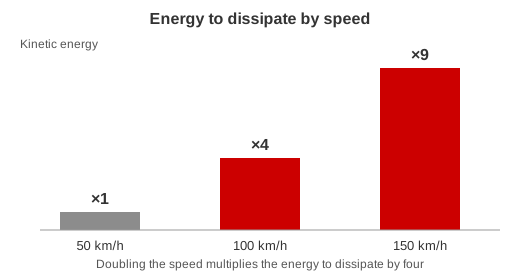
This energy is proportional to the mass and the square of the velocity (E = ½ mv²). It's easy to understand, then, that the heavier a vehicle is, the more substantial its braking system needs to be, capable of dissipating significant energy and withstanding repeated temperature increases. The impact of speed is even more significant: doubling the speed quadruples the energy that must be dissipated during braking. This must be factored into the determination of the braking point on a track: braking distance and heat resistance!
How does it work?
There are several types of braking systems, but the most common on our vehicles is braking provided by brake fluid, calipers, discs, and pads. Our apologies to owners of classic vehicles equipped with drum brakes, or to those, more ambitious, who have attempted to install electro-pneumatic train braking systems...
The complete braking system, from the pedal to the disc, is divided into four parts.
The brake booster (master-vac)
The first, the brake booster, amplifies the pressure exerted by the driver on the brake pedal. Its detailed operation is not relevant here, as many racing or "extreme" production vehicles are not equipped with it. The major difference lies in the pedal feel: a production vehicle equipped with a brake booster requires less pressure and is more comfortable, whereas a vehicle without assistance offers a very firm pedal with little travel.
The master cylinder
The second part transforms the pressure exerted by the driver on the pedal into hydraulic energy, distributed to the different wheels: this is the master cylinder (MC). A piston compresses the brake fluid in response to the pedal action and sends it through the brake lines. It is easily located in the engine compartment, as it is generally situated just below the brake fluid reservoir.
Its role is crucial, and the system's sealing must be closely monitored: sometimes you can spend hours wondering why the brakes lack bite, when you've neglected the master cylinder. The seals expand with time and wear, which can reduce the internal pressure. On a vehicle that has been sitting for a long time, the piston can also develop some seizing. Finally, there's bleeding the brakes. Be careful with the "old-fashioned" method of pumping the pedal: don't overdo it, or you risk damaging the master cylinder seals!
The brake caliper
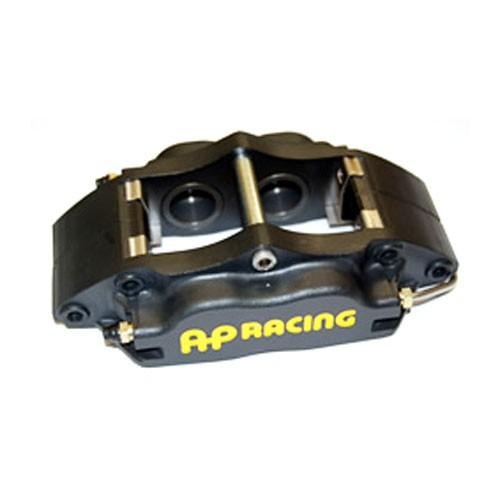
With the fluid compressed, this hydraulic force must now be converted into mechanical energy. This is the role of the caliper, which receives the pressurized fluid and pushes one or more pistons. Manufacturers have many options: fixed or floating calipers, single-piston or multi-piston. On modern sports cars, fixed multi-piston calipers are the most common and effective solution. But you don't have to go back that far to find sports cars with single-piston brakes, like the BMW M3 E36...
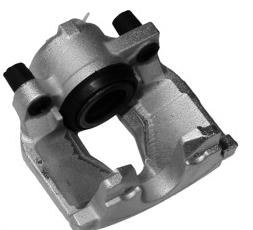
The single-piston floating caliper is the least expensive and most widely used system by mainstream manufacturers. Its principle is simple: pressurized fluid pushes the piston, which then presses the inner brake pad against the disc. The caliper then moves inward, thanks to sliding guides, continuing to press against the disc, thus bringing the second brake pad into contact. Be aware that this type of caliper can seize with wear, especially on vehicles that have been sitting for extended periods.
The multi-piston fixed caliper : manufacturers offer a wide variety of products with two, four, six, or even eight pistons. There are no sliding guides to allow it to move: the pistons bring the brake pads together on each side of the disc. The advantages are numerous: better distributed hydraulic pressure on the pads, less risk of caliper seizing, and smaller, lighter pistons that move very quickly (sharper bite). On the other hand, they are expensive to manufacture, more bulky, and require careful maintenance: more pistons mean more seals subjected to high temperatures and wear.
It's all about compromise here: a system with many pistons and large calipers is heavy, bulky (requiring larger rims), and expensive. This is why it's difficult to take a stock city car to the track: its brakes aren't designed to withstand repeated hard braking, but they're sufficient for normal driving conditions. And if you're considering upgrading your calipers to a larger model, remember to factor in the added bulk and increased unsprung weight if you're forced to fit larger rims.
Discs and pads
We now come to the final components of the system, which play the most important role: dissipating the energy of the moving vehicle. The car slows down through friction: the disc rotates with the wheel, and the brake pads, fixed in the caliper, clamp it under the pressure exerted by the pistons. It is this friction that generates heat and allows the car to brake. The quality of the discs and pads is therefore crucial for effective and consistent braking. Their wear must be closely monitored, and when considering track use with a production vehicle, it's essential to remember that the braking system isn't necessarily designed for intensive use on a racetrack!
Warped discs... a myth?
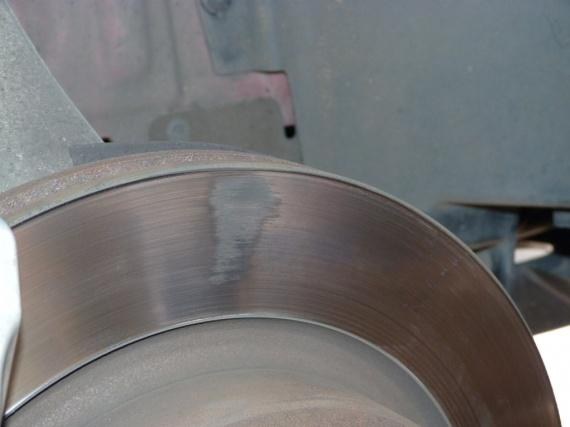
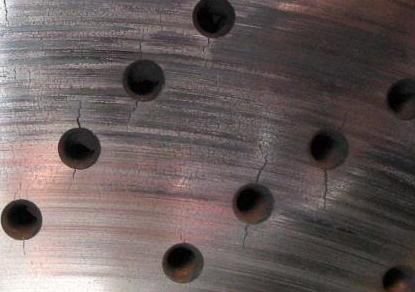
This is a sensitive issue that needs clarification before incurring unnecessary expenses. In 99% of cases, a brake disc doesn't warp. What happens is that pad material is deposited on the disc and stagnates there because of high temperatures, causing vibrations under braking. The term "warped" is a misnomer, since the disc doesn't actually twist. The uneven deposit can even locally alter the quality of the cast iron in the event of very high temperatures. The causes of overheating are varied: an undersized braking system for the intended use, an unsuitable braking technique (progressive braking), or inadequate brake cooling.
So what should you do when your brakes vibrate? Clean your discs as soon as possible: brake cleaner, disc resurfacing, or heavy braking with highly abrasive pads—any method is good for removing the deposits. It's crucial not to persist for too long if the vibrations continue, because beyond a certain point, it becomes irreversible: the brake pad residue becomes embedded in the material and locally alters the disc's structure.
The braking technique
With the technical aspects covered, we can finally talk about what happens on the track. As you've probably gathered, it's impossible to define a single rule for braking point, pedal pressure, and where to stop braking, given the significant influence of external factors... It's off to a great start! But all braking maneuvers are similar and share a common goal: to slow down and position the car to prepare for the corner exit.
The first thing to keep in mind is that when driving on a track, you have to forget what your driving instructor taught you. There are three ways to brake: progressive braking, constant braking and trail braking (gradually releasing the pedal). In track driving, progressive braking, the kind we all use every day, has no place in your vocabulary: it is comfortable, but completely unsuited to the circuit.
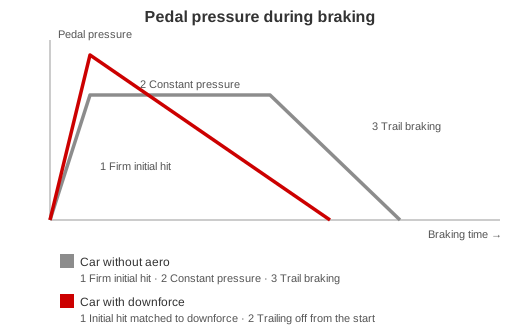
Next, we need to distinguish between two categories of vehicles: those without significant aerodynamic downforce, and those with it. For example, a Formula 1 driver who releases the accelerator can experience, depending on the speed, a deceleration of 1 G without even touching the brake pedal. The braking technique in Formula 1 is therefore quite different from that in a Clio RS. To understand this, we need to recall what we saw in issue 2 of the magazine: during braking, there is a load transfer onto the front axle that presses the wheels into the ground. On an F1 car or any other vehicle with aerodynamic downforce, this load varies throughout the deceleration, because aerodynamic downforce is directly related to speed. But on a conventional vehicle, once the transfer has occurred, the load on the front axle remains virtually constant. The wheel lock-up limit therefore varies considerably on a vehicle with aerodynamic downforce, whereas it is almost constant on a production vehicle. Since we seek to get as close as possible to this limit without ever exceeding it, the technique is not exactly the same.
Emergency braking: understanding ABS
Why analyze emergency braking? To see the action of the ABS, which corrects the pressure as soon as the locking limit is reached. The curve recorded on a production vehicle shows:
- a firm initial brake application;
- constant pressure throughout the braking;
- the ABS kicking in at several points (the small dips).
We can see that, during emergency braking, the pressure hardly varies between the start and the end of the braking. This is because the load on the front axle does not change, and therefore the wheel lock-up limit is constant. If this limit decreased with speed, the ABS would adjust the pressure to a lower value as the speed decreased.
In action
The first thing to do when looking for ideal braking on the track is to find the wheel lock-up limit: to get as close as possible to it, you need to know where it is! Locking the wheels once lets you gauge the maximum pedal pressure for your vehicle and the driving conditions: weather, condition of your tires and of the surface, etc. The aim is to get as close as possible to this value, as quickly as possible, without ever reaching it: this is the initial brake application. It must be firm and precise, and made with the steering as straight as possible. The load transfer to the front is violent, so the rear of the car is unloaded: too much steering angle at that moment can end very badly. This is why, in the special cases where braking takes place in a corner, you must adapt your line so as to have a "straight bit" in which to hit the brakes.
The idea is to avoid engaging the ABS every time you brake, since it releases pressure as soon as you reach the locking limit: the braking distance will be longer (the main role of ABS is not to reduce braking distance, but to maintain steering control in an emergency). You have to find the precise balance to stay as close as possible to the limit.
Next, you need to adapt to the situation. If it's a textbook straight-line braking and you're in a production car without significant downforce, there's no reason to ease off the pedal: this is a "constant" braking phase, where you try to stay as close as possible to the wheel lock-up limit (pure slowing down). Trail braking only begins when you turn the wheel, for the turn-in phase covered in the previous issue. In reality, at high speed, even a car without significant aerodynamics gets some downforce on the front axle depending on the shape of the bodywork, so you need to adapt your pedal pressure slightly, but these effects are only felt at very high speed.
If you're in a car with aero, it gets more complicated: you have to adapt to the load decreasing on the front axle and trail brake right from the start. For the other cars, you have to adapt to the car in question, starting the trail braking very early.
Define your braking point
As with many aspects of track driving, you have to start from the end to define the actions you want to take: in this case, braking! In theory, braking ends when the driver is able to resume accelerating, that is, when the car is positioned and facing the exit. Except for a few specific cases of very long corners, you either brake or accelerate: there's very little waiting involved.
It's impossible to define a single rule that will work on every corner and every car, but generally speaking, the end of braking occurs around the apex. In the example of the Museum corner at Le Mans, it's located slightly before the apex: the goal is to bring the brakes to this point to have the vehicle perfectly positioned and oriented towards the exit. With a car without aero, between hitting the brakes and turning the wheel, you can hold a constant pressure and only start trail braking when you begin to turn in. The pressure must be adapted to the conditions: dry or slippery surface, standard tires or slicks, downhill or uphill corner, bumpy track, etc.
When you're starting out, it's often difficult to trail brake because you've scrubbed off too much speed before the corner. You end up with a low entry speed and want to get back on the accelerator too soon! As the positioning isn't finished, this generally means understeer on the exit. You have to adapt to each corner according to your approach speed, delaying your braking point little by little so that the moment you release the brake pedal matches exactly the moment you can get back on the accelerator.
Here's a good way to know whether you made the right moves at the right time: "If you have to lift off the accelerator on the way out of a corner, something went wrong on the way in. Normally, once you are back on the power, you shouldn't lift off again until the next braking." This lets you analyze yourself and correct your actions on the next pass.
Determining the correct braking point when approaching a corner is never easy, and there's no universal rule: it depends on numerous parameters (approach speed, braking system, tire type and condition, suspension, road surface, weather conditions, etc.). Adapting to the circumstances is key to successfully determining the right braking point yourself, always keeping in mind that the goal of track driving isn't to brake later than everyone else. Braking late, yes, but while aiming for the highest possible corner exit speed.
The cool-down lap
Taking a cool-down lap at the end of the session is essential to cool your brakes (and the engine...). Stopping in the pits with still-hot brakes can have disastrous consequences: we've seen cars catch fire! Depending on the track day you're driving at, the briefing may give different instructions, but in general you can use your hazard lights to let the other participants know you're on a cool-down lap.
Be careful not to do this lap too slowly, otherwise the airflow won't be strong enough to cool the brakes. A speed between 80 and 100 km/h is sufficient for proper ventilation. Try to use the brakes as little as possible during this lap.
This article is from issue 3 of Racer's, Marc Peraldi's magazine. Thank you, Marc!